Ordered the compensator and ball joints from GSF yesterday afternoon and they arrived this morning!! I am very impressed with their service. The prices are not bad too (although the compensator was £75).
See about trying to fit some of this later today if the weather is ok. Looking pretty miserable at the moment
Posted 14 May 2008 - 08:50 PM
Had a look at my bits that arrived. Dead pleased with the new compensator. No pics today but will post tomorrow hopefully.
Had a go at replacing the damaged ball joint. It went very smoothly. That Dewalt impact wrench I bought is the best tool I have ever bought. Anyone that has ever tried to remove a ball joint when its on the car will testify to how difficult it can be. With the impact wrench it just popped off no problem. Probably helped that it was new though. I am liking working on the car more and more now that there are more new bits.
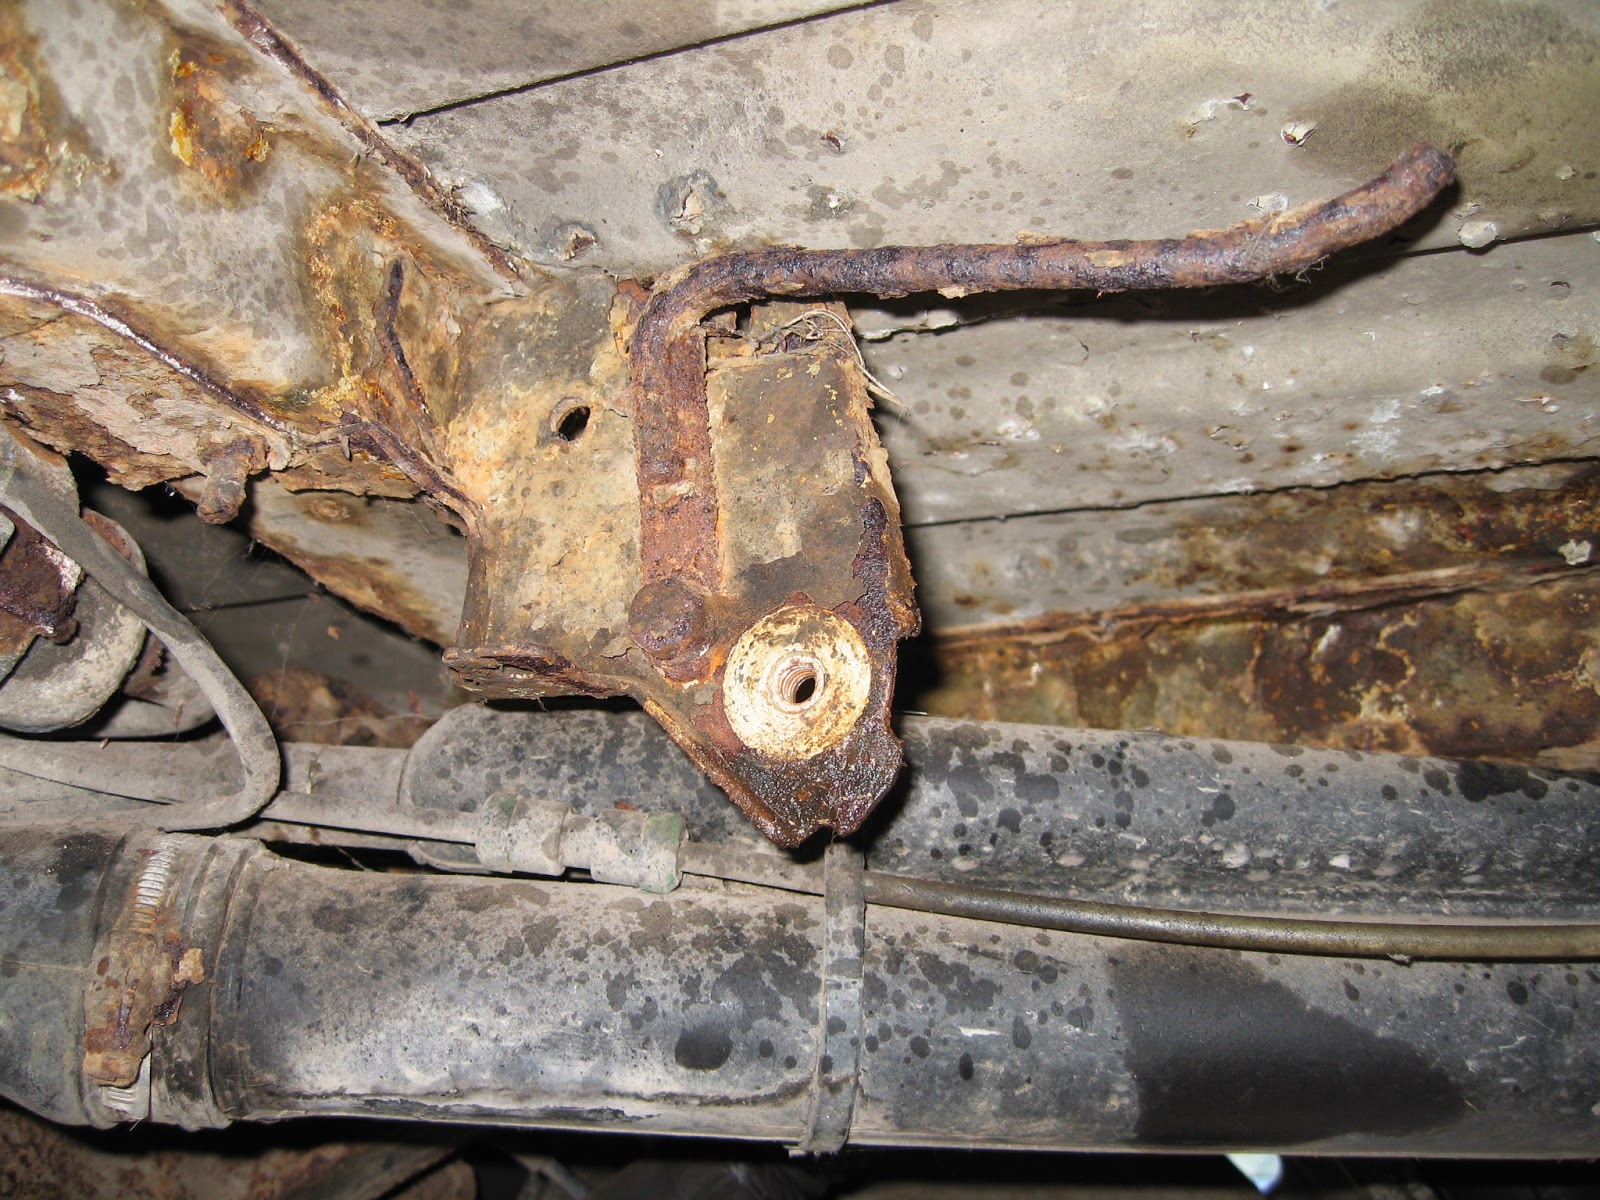
Whilst under the front had a look at the underside. Brake pipes front to rear look a little worse for wear as does the fuel pipes (which have also been patched in the middle with a bit of rubber hose I notice). They will all need replaced. Also had a look at how difficult it would be to drop the front subframe for refurbishment. Looks like it will be possibly more hassle than its worth as I will need to support the car on the sills with axle stands. Would be much easier if I had an inspection pit or ramps. So I think I may not do this and leave it for another day. Although I may change my mind.
If I get more good weather tomorrow night I think I will remove the rusted brake lines up to the old compensator so I can get that off for replacement. I see it sits on a bracket that could probably do with tarting up before going back on the car.
Till tomorrow
Posted 15 May 2008 - 08:59 PM
Did not have such a productive evening tonight. Wanted to turn the car around so it was facing the house to make working on the back end a bit easier. Unfortunately the engine would barely run for some odd reason. Started fine and ran fine for a few mins whilst I pumped up the flat tire. Then all of a sudden it started to run really rough to now where it barely starts.
I am wondering if it has perhaps run out of fuel and is running on the dregs in the tank. Will take off a fuel hose tomorrow and see.
Put some back to black on the trim outside. What a difference that has made to the look of the car. Looks almost as if it could drive again if it wasn't for the badly cracked tires. Intend on getting them replaced when the alloys get refurbished.
Posted 16 May 2008 - 09:42 PM
Time for today's update.
First the pictures of the new load compensator I promised.


Today I decided that the rear beam had to come off to inspect, help me get at the rust on the back end and get everything painted up. It will also make the compensator replacement easier.
So I proceeded. Here is a before pic for reference.

I jacked up the car and supported it using axle stands on the rear jacking points. Seems to be secure like that. The first sign of potential problems is the drivers side rear wheel. Does this look like a funny angle to you guys??

The first thing in the way was the old spare wheel. Wheel carrier was seized (it was probably seized before it went odd the road. Crap design. This was removed.


The actual carrier itself was seized at the hinges. I decided to take that off too. Got out my trusty can of WD40 and my impact wrench and set on to it. The first bolt came off fine but the other snapped. I sensed this was not going to go my way. Removed the carrier and then the rear silencer to give me a better look underneath. Not a pretty sight!!


Realise at this point that I had stupidly sat on my camera and cracked the screen!! Bugger. Its my own fault though. Will have to see if I can get a screen off the internet to replace it.
After this I scrapped away some of the worst of the rust and it maybe is not quite as bad as it looks. I hope! I disconnected the handbrake cables and tried to remove the compensator brake pipes. Of course they were seized too. One is rounded the other came off but is twisted. I intended on replacing these anyway.
But this is as far as I got. You need a long reach torx bit to remove the axle holding on bolts and by long reach ones are too to get through the hole in the axle. I will need to see what Halfords sell tomorrow.
I hope I don't regret taking this off !!
Posted 17 May 2008 - 11:42 PM
Today was not as productive as I would have hoped. I was hampered by rain for most of the morning and early afternoon. I got lots of underseal, seam sealer, krust etc from Halfords with the intention of getting the beam off and wire brushing.
Sadly I was stopped in my tracks when I could get all but one holding bolt out. The last one is the front one on the passenger side. Its rounded. Its another poor design by pug. Why do they insist on using Torx bolts everywhere. On the bottom of the car they are the first things to go rusty!!! Grr.
So beaten by this I gave up and set about scrapping the worst of the rust off the underside. Good news is that although it looks bad it mostly just loose surface rust. Had the car been on the road most of it would have fallen off by now. Still it comes off easily.
So tomorrow its more scrapping and hopefully get the drill with the wire brush attachment out.
I might also take my dremel with the cutting tool to that last bolt and see how I get on.
No pics today as I left the camera in the car. Doh!!
Posted 18 May 2008 - 11:38 PM
I had an excellent days work today
Had a bit of a brainwave last night as to how to get the last axle holding on bolt off. If you remove the rear seat you can access the top of the bolts. I proceeded to hammer on a female torx socket and off the bolt came. Very pleased indeed. Some pics from today and yesterday.


If anyone is doing this I would suggest in investing in some nice long torx keys from Clarke. Got them as part of a set from Machine Mart. They made this job alot easier.
With the axle off it was time to survey the condition at the rear and of the axle.


Set about it with a wire brush attached to a drill

This revealed that most of it is just surface rust with a few bits that were abit worse but salvageable. No obvious welding required. I can't weld so its just as well. If any of you are considering doing similar to your cars, I remind you that adequate protective equipment is a MUST.

Stripped the brakes etc of the axle again. Got all the brackets etc off it so I can clean and paint them. Managed to snap a couple of bolts in the process. Will have to get these out at a later date.

I think my plan next it to figure out how to strip the axle for inspection. Anyone ever done this?? Its not like to 205 one unfortunately. Also got more prep to do on the rear end before I can seal the seams, prime and underseal. May also need to drop the fuel tank. The holding bolts for it are badly corroded.
Progress may slow down a little now as I am probably going to be away for the next 2 weekends.
Posted 22 May 2008 - 08:53 PM
Got a chance to be a wee bit more poking about today. I have been pulling back the underseal where it is obviously split and exposing alot of hidden rust (mostly surface rust). The drivers side rear sill was a big problem today though. Exposed a fair bit of what looked like surface rust then my finger went right through it. Poking about a bit more revealed a massive hole in the sill that was just held together by the underseal. No pics today but I will try and get some tomorrow.
It looks like its an easy welding job to fix but still another thing I was not counting on. Will have to get my pal to weld it for me.
I need to learn to just ignore some bits I think. I was very close to removing the rear bumper tonight cause I saw some rust under there.
Posted 25 May 2008 - 09:32 PM
Been at the Jim Clarke rally all weekend so not much progress to report.
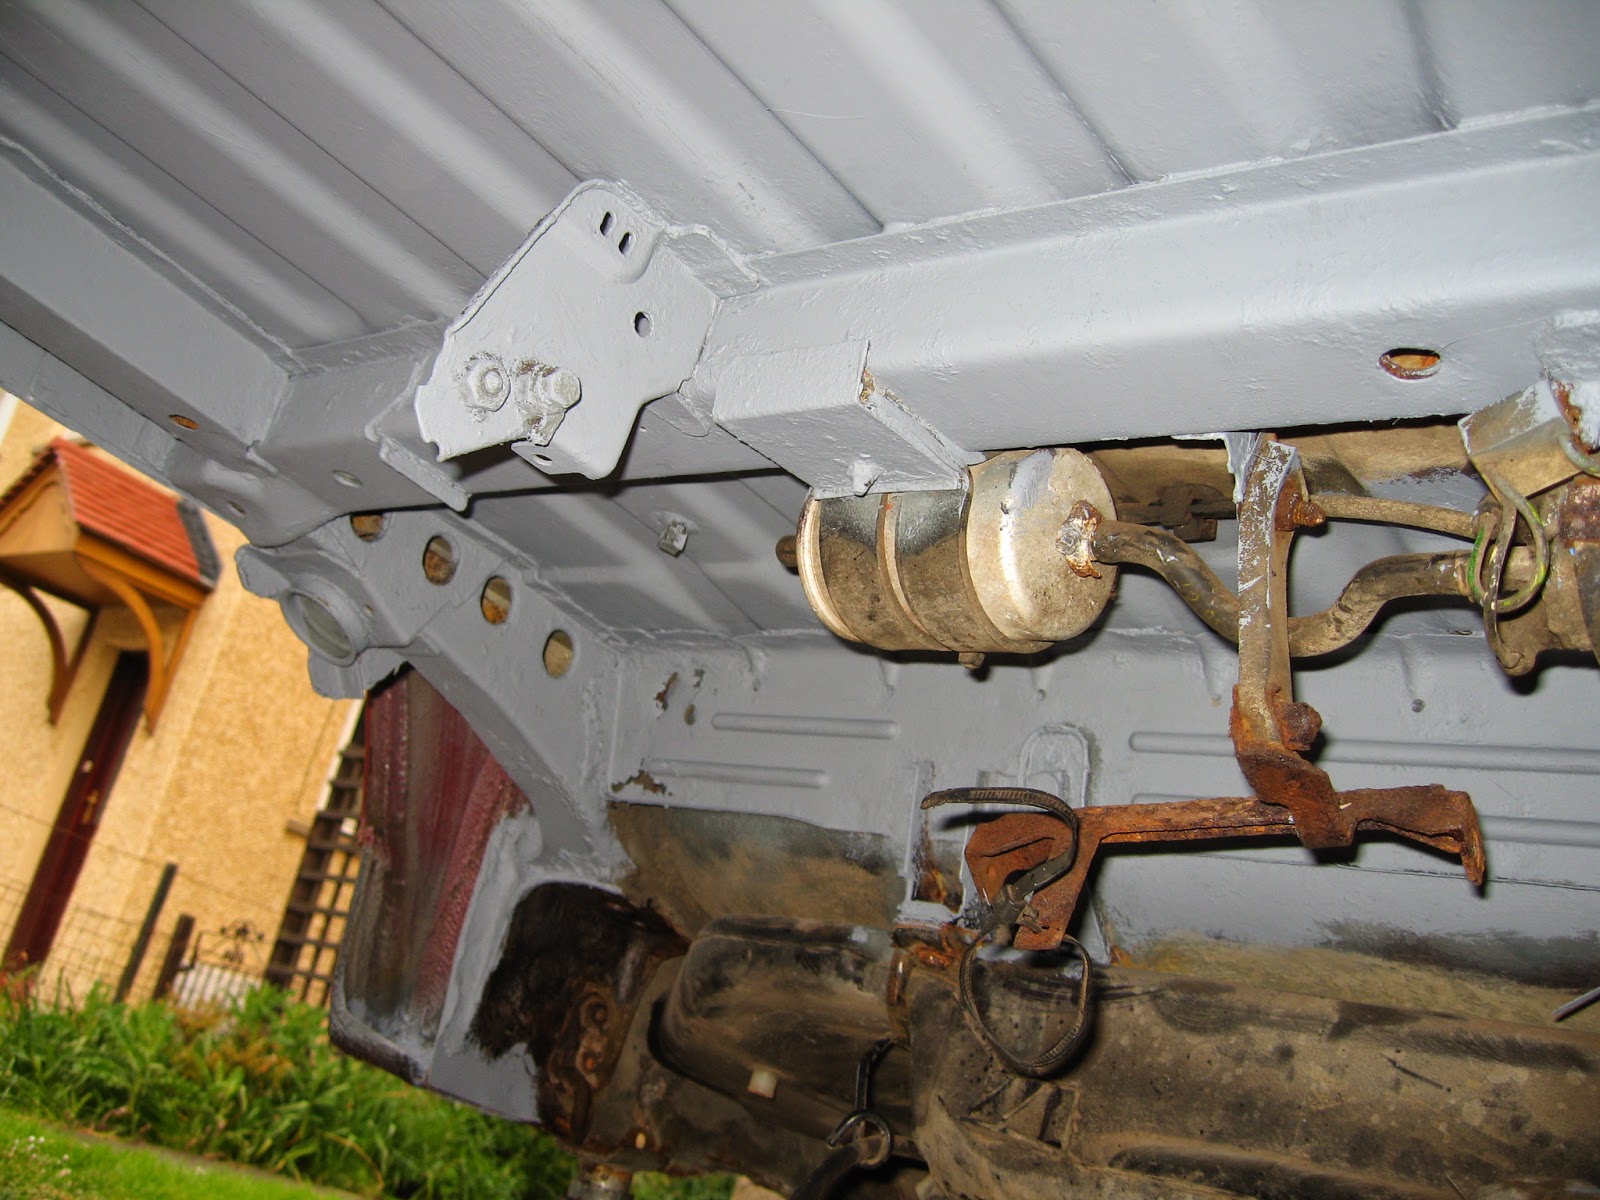
Did stop off on the way home though. Got some painting done on the nicely cleaned underside. Bit short on pics from the cleaning process but there is one pic above. It was very messy indeed.
During the cleaning I decided to peel back the underseal where there were obvious cracks or bulges. These were cleaned up with my wire brush drill and painted with a zinc based spray primer. Used this primer on all the other cleaned parts on the underside.
Today moved onto a thicker anti rust primer applied using a brush. The whole rear underside took 2 1/2 hrs ! Worth it though, its amazing the difference it makes.


I would quite like to remove the fuel filter and the other thing (fuel pump?) and get behind them but the bracket is so rusted that I don't think I would be able to get it off without damaging it. Just paint it and hopefully it will last a few years yet.
After a wee bit humming and hawing I have decided to have a go at rebuilding the axle. Its off and it would be a shame to put it back on only to realise that it has to come off again. This way I know its good and I can have it cleaned and painted whilst I am at it.
Wish me luck.
Tomorrow I am away to visit a decommissioned power station at Inverkip before they knock it down. Weather dependant though I hope to get stripping that axle this week and get another coat of primer on.
Posted 29 May 2008 - 10:33 PM
Time for today's update. Today I put a second coat of primer on the underside. Not got any pics of that but it looks the same as above
Once I was finished doing that I had a go at the axle. First job I had was to remove the rear hubs. These needed to come off anyway as they are non ABS items (from when the axle was replaced before) and I want to get the ABS working again for the MOT. They were pretty easy to remove. Pull off the dust cap then remove the hub nut. Put a set of pullers over the hub and tighten up and off the hub comes. Leaves the inner race on the stub axle but I will cut this off another time. I also took the opportunity to remove the mounting bracket and the brake shield (although the shield requires the inner race off so that will have to wait).


Next I had a go at removing the mounting bushes.

Firstly you have to slacken the centre mounting bolt and tap it out with a hammer.

This leaves you with the bush on its own. On inspection mine appear absolutely fine. No issues with them at all. I may just leave them in. What do you guys think? Should I go to the hassle of fitting powerflex or similar items if available? Is it actually worth it?

Next I had a go at removing the struts. These are weeping and will need replaced. Managed to get the top bolt out but the bottom one is held by a rather large Allen key bolt. Its about 14mm. Who has an Allen key that size??? Trip to Halfords for me I think next opportunity.
So I am now at the point where I have to decide do I strip the axle further or not. I have read somewhere that I need a dummy shock? Does anyone know if this is the case? The haynes manual is reasonable but does not go into the detail I need to get this right. Don't want to bugger up the ride height or worse.
Anyone ever done this who can do me a quick how too?
No comments:
Post a Comment